
I absolutely adore making these festive, fun, and utterly delicious Tree Krispie Treats Recipe every holiday season. There is something so heartwarming about the crispy, chewy texture combined with the sweet vanilla marshmallow flavor and that perfect pop of color from the green gel food coloring. The crunchy Rice Krispies base feels nostalgic yet festive when shaped like little Christmas trees, and the white chocolate with colorful mini M&M’s brings the treats to life like edible holiday art! I love sharing this recipe with friends and family because it’s straightforward, fun to make, and always a huge hit.
Why You'll Love This Tree Krispie Treats Recipe
What truly makes this Tree Krispie Treats Recipe stand out for me is the magical flavor combination of buttery, gooey marshmallows with the crisp Rice Krispies cereal. The vanilla and just a few drops of green gel food coloring turn the treat into a playful holiday delight that’s both visually appealing and crave-worthy. The white chocolate drizzle acts as a delicate garland across these little trees, and the mini M&M’s as ornaments add just enough crunch and sweetness to make every bite exciting. It’s a perfect balance of texture and flavor that feels both nostalgic and festive at the same time.
I also love how simple this recipe is to prepare, despite its festive flair. With just a handful of ingredients, you can whip this up quickly and still impress everyone at your holiday gatherings. It’s practical but fun to make, especially with kids who enjoy decorating the trees with colorful sprinkles and candies. This recipe is ideal for holiday parties, bake sales, or even just a cozy night in when you want a little seasonal treat. Honestly, I find myself craving it even outside the holidays because it’s just that good!
Ingredients You'll Need
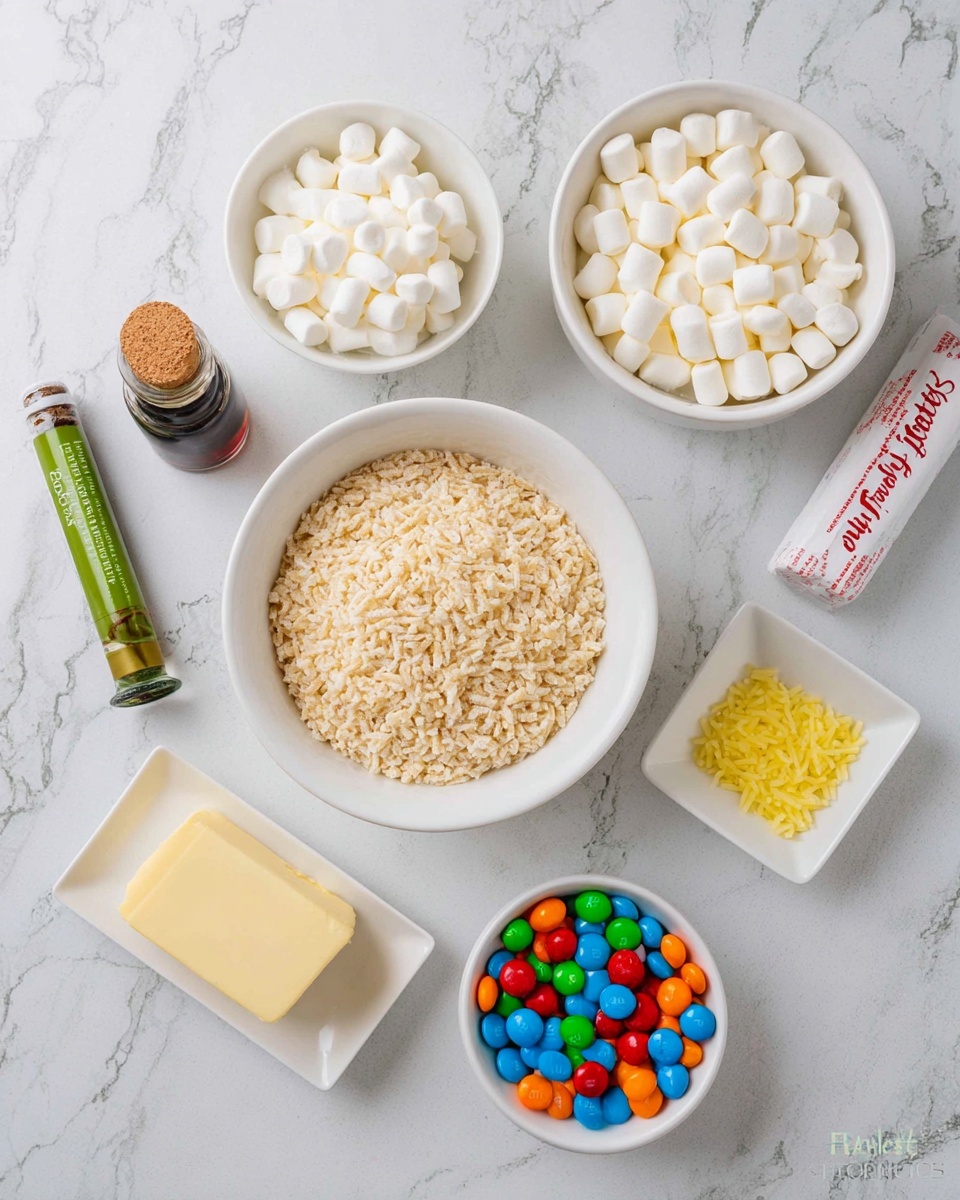
This recipe calls for a few simple ingredients that come together to create the perfect combination of flavor, texture, and color. Each ingredient is essential to delivering that classic Rice Krispies treat taste with a festive twist.
- Butter (4 tablespoons): Provides rich flavor and helps melt the marshmallows smoothly.
- Mini marshmallows (1 bag, 10 oz): The gooey binder that gives the treats their classic chewy texture.
- Vanilla extract (1 teaspoon): Adds warm, sweet depth that enhances marshmallow flavor.
- Green gel food coloring: Just a few drops to turn the treats into festive green trees without affecting taste.
- Rice Krispies cereal (9 cups): The crispy base that adds light texture and keeps the treats airy.
- White chocolate chips or melting wafers (1 cup): Used for drizzling garland and adding indulgent sweetness.
- Mini M&M’s: Serve as colorful ornaments to decorate the trees and add candy crunch.
- Star-shaped sprinkles: The finishing touch that tops each tree with a festive flair.
Directions
Step 1: Line a 9x13-inch baking dish with parchment paper, making sure to leave an overhang on the sides—this will make it so much easier to lift out the treat block later when cutting out your tree shapes.
Step 2: In a large pot over medium-low heat, melt the butter slowly until fully liquid but not browned. Keep the heat gentle to avoid burning.
Step 3: Add all the mini marshmallows into the melted butter and stir constantly with a silicone spatula or wooden spoon until the marshmallows have completely melted into a smooth, shiny mixture.
Step 4: Remove the pot from heat right away and stir in the vanilla extract along with 2-3 drops of green gel food coloring. Stir gently until the green color is evenly distributed throughout the marshmallow mixture.
Step 5: Quickly add the Rice Krispies cereal to the pot and fold it in until all the cereal is thoroughly coated in the green marshmallow glaze. Work fast so the marshmallow doesn’t harden before mixing.
Step 6: Pour the mixture into the prepared pan and press it down lightly with a sheet of wax paper or your hands sprayed lightly with nonstick spray. Be careful not to press too firmly to keep the treats soft and chewy rather than hard and crumbly.
Step 7: Let the treats sit at room temperature for about 20 minutes so they set up enough to cut but aren’t rock hard.
Step 8: Using the parchment paper overhang, gently lift the treat slab out of the pan. First, cut it into two long rectangles, then slice each rectangle diagonally into six triangular pieces to create the classic tree shape.
Step 9: Melt the white chocolate chips or melting wafers in the microwave in 20-second bursts, stirring thoroughly between each burst until smooth and glossy. Transfer the melted chocolate into a piping or Ziplock bag with a tiny corner cut off.
Step 10: Pipe white chocolate garlands across each tree in a zigzag pattern. While the chocolate is still wet, quickly add star-shaped sprinkles to the top of each tree and press in mini M&M’s as colorful ornaments.
Step 11: Allow the white chocolate to harden completely at room temperature before serving or storing your beautiful Tree Krispie Treats. Enjoy the festive fun with every bite!
Servings and Timing
This batch of Tree Krispie Treats will yield about 12 festive tree-shaped servings, perfect for sharing during holiday parties or family gatherings. The prep time is roughly 15 minutes, mainly melting and mixing, with about 20 minutes of cooling time before cutting. Since there is no actual baking involved, the total time from start to finish is approximately 1 hour and 25 minutes, including time for the chocolate decoration to fully set. These treats are perfect for making ahead and storing until you’re ready to celebrate!
How to Serve This Tree Krispie Treats Recipe
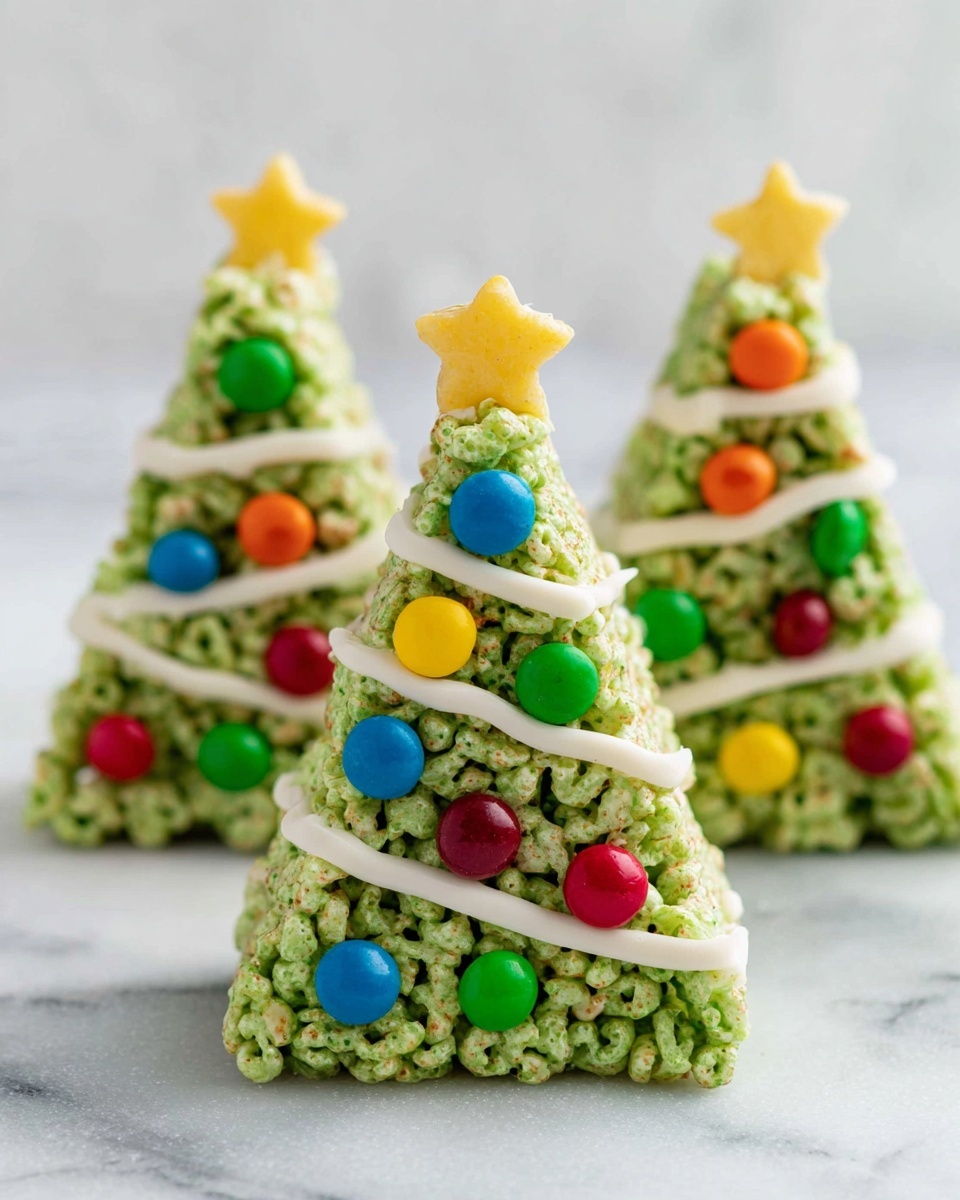
I love serving these Tree Krispie Treats at holiday parties and family get-togethers because they’re a guaranteed crowd-pleaser. They look so festive displayed on a holiday-themed platter or a rustic wooden cutting board, especially when the white chocolate garland sparkles under the lights. For a fun presentation, I arrange the trees in a circle or row to resemble a forest, which always prompts compliments and photo requests!
When it comes to accompaniments, these treats are sweet and rich enough on their own, but they pair wonderfully with a warm cup of cocoa, peppermint hot chocolate, or even a glass of cold milk to balance the sweetness. If you’re serving adults, a light, crisp sparkling wine or a fun holiday cocktail like an eggnog martini can also complement the flavors beautifully.
I usually serve them at room temperature so the marshmallow texture is perfect—soft, chewy, and not sticky cold or overly melty warm. Cut into slightly smaller portions if you want bite-sized treats for a party platter or larger triangles if gearing up for after-dinner indulgence. Either way, these little trees never last long because they’re so addictive!
Variations
One of the things I love about this Tree Krispie Treats Recipe is how easy it is to customize and make your own. For instance, swapping the green gel food coloring for red or a mix of colors can create a fun twist for Valentine’s Day or other seasons. If you want to switch up the flavor, adding a teaspoon of peppermint extract instead of vanilla gives it a cool holiday kick that pairs beautifully with the white chocolate and candies.
If you or someone you know follows a dietary restriction, there are simple ways to adapt the recipe. Using vegan butter and marshmallows can make these treats completely vegan without compromising flavor or texture. For gluten-free versions, just double-check your Rice Krispies cereal as not all brands are gluten-free, and substitute the chocolate chips with dairy-free options if needed.
You could also experiment with different decorations like crushed candy canes for extra crunch or use peanut butter chips in place of white chocolate for a richer taste. And if you want to skip the stovetop step, microwave melting the butter and marshmallows in short intervals is a handy shortcut that still yields great results.
Storage and Reheating
Storing Leftovers
Leftover Tree Krispie Treats store wonderfully in an airtight container at room temperature for up to 3-4 days. I like to layer pieces between sheets of wax paper or parchment paper to prevent sticking and keep the decorations intact. Avoid storing them in a humid environment as the treats can become sticky or lose their crispness over time.
Freezing
You can freeze these treats to enjoy later! Wrap individual pieces tightly in plastic wrap, then place them in a freezer-safe airtight container or zip-top bag. Frozen treats will keep for about 1 to 2 months. When you’re ready to eat, just thaw at room temperature for a few hours, and they will regain their perfect chewy texture without losing flavor.
Reheating
Because these are Rice Krispies treats decorated with chocolate and candy, I don’t recommend reheating in the microwave or oven as it may melt decorations and alter texture. Instead, bring them out of storage or freezer and allow them to come to room temperature naturally for the best texture and taste. If your kitchen is cold or the treats feel too firm, sitting out for about 30 minutes usually softens them nicely without any loss in quality.
FAQs
Can I use regular-sized marshmallows instead of mini marshmallows?
Yes, you can! Using regular-sized marshmallows will work just fine, but I find that mini marshmallows melt more quickly and evenly, making the texture smoother and the mixing easier. If using regular-sized, just keep stirring a bit longer to ensure complete melting.
How do I get the perfect green color without affecting the taste?
Using gel food coloring is key because it provides vibrant color with just a few drops and won’t thin out the marshmallow mixture like liquid food coloring might. Start with 2-3 drops and add more if you want a deeper green, mixing well to avoid streaks without making the treats taste artificial.
Can I make these treats ahead of time for a party?
Absolutely! I often make these a day or two in advance. Just store them in an airtight container at room temperature to keep them fresh. The decorations hold up well, and the treats will be just as tasty and festive when served.
What if I don’t have a piping bag for the white chocolate garland?
No worries! A Ziplock bag with a tiny corner snipped off works just as well for piping. Alternatively, you can spread the melted chocolate with a spoon and decorate with sprinkles quickly before it sets for a more rustic look.
Is it okay to press the mixture down hard in the pan?
I recommend pressing the mixture down very gently and evenly. Pressing too firmly can make the treats dense and tough. A light hand keeps the texture soft, chewy, and delicate, which is exactly how I like my Tree Krispie Treats!
Conclusion
I hope you’ll have as much fun making and eating this Tree Krispie Treats Recipe as I do every year. It’s such a joyful, festive creation that brings a sparkle to any holiday table. Simple, colorful, and full of classic flavors, these treats are the perfect way to celebrate the season and make sweet memories with loved ones. Give it a try and watch how quickly they disappear!
Print
Tree Krispie Treats Recipe
- Prep Time: 20 minutes
- Cook Time: 10 minutes
- Total Time: 1 hour 25 minutes
- Yield: 12 servings
- Category: Dessert
- Method: Stovetop
- Cuisine: American
Description
Delightfully festive and easy-to-make Tree Krispie Treats, perfect for holiday celebrations. These vibrant green Rice Krispies treats are shaped like Christmas trees and decorated with white chocolate garlands, mini M&M's ornaments, and star sprinkles, making them an irresistible and fun holiday snack for kids and adults alike.
Ingredients
Main Ingredients
- 4 tablespoons butter
- 1 bag (10 oz) mini marshmallows
- 1 teaspoon vanilla extract
- green gel food coloring (2-3 drops or more as needed)
- 9 cups Rice Krispies cereal
Decorations
- 1 cup white chocolate chips OR white melting wafers
- mini M&M's
- star-shaped sprinkles
Instructions
- Prepare the Pan: Line a 9x13-inch baking dish with parchment paper, leaving an overhang for easy removal, or lightly spray with nonstick cooking spray. Set aside.
- Melt Butter: In a large pot over medium-low heat, gently melt the butter until fully liquefied.
- Add Marshmallows: Add the mini marshmallows to the melted butter and stir constantly until they become completely smooth and melted.
- Add Flavor and Color: Remove the pot from heat. Immediately stir in the vanilla extract and 2-3 drops of green gel food coloring (add more if desired) until the color is evenly distributed.
- Mix with Cereal: Add the Rice Krispies cereal to the marshmallow mixture and stir carefully until the cereal is thoroughly coated.
- Press Mixture Into Pan: Transfer the mixture into the prepared pan. Use wax paper or hands lightly sprayed with nonstick spray to gently press the mixture into an even layer without compressing too much, to keep the treats light and chewy.
- Cool Slightly: Allow the treats to set and cool at room temperature for about 20 minutes until slightly firm.
- Cut Into Tree Shapes: Lift the treat slab out of the pan using the parchment overhang. Using a sharp knife, cut into two long rectangles, then slice each rectangle diagonally into six triangles for tree shapes (12 trees total).
- Melt White Chocolate: Melt white chocolate chips or candy melts in the microwave in 20-second bursts, stirring well after each until smooth and fully melted.
- Decorate Trees: Transfer melted chocolate to a piping or Ziplock bag with a small snip in the corner. Pipe garlands across each tree. While the chocolate is still melted, place star-shaped sprinkles at the top and add mini M&M’s as ornaments.
- Set Decoration: Allow the chocolate decoration to harden completely before serving or storing.
Notes
- For easier removal, lining the pan with parchment paper with an overhang is highly recommended.
- Do not press the Rice Krispies mixture too firmly to avoid tough, dry treats.
- Adjust green gel food coloring to your preferred shade of green.
- White chocolate or melting wafers work equally well for decorating.
- Store treats in an airtight container at room temperature to maintain freshness.


Leave a Reply